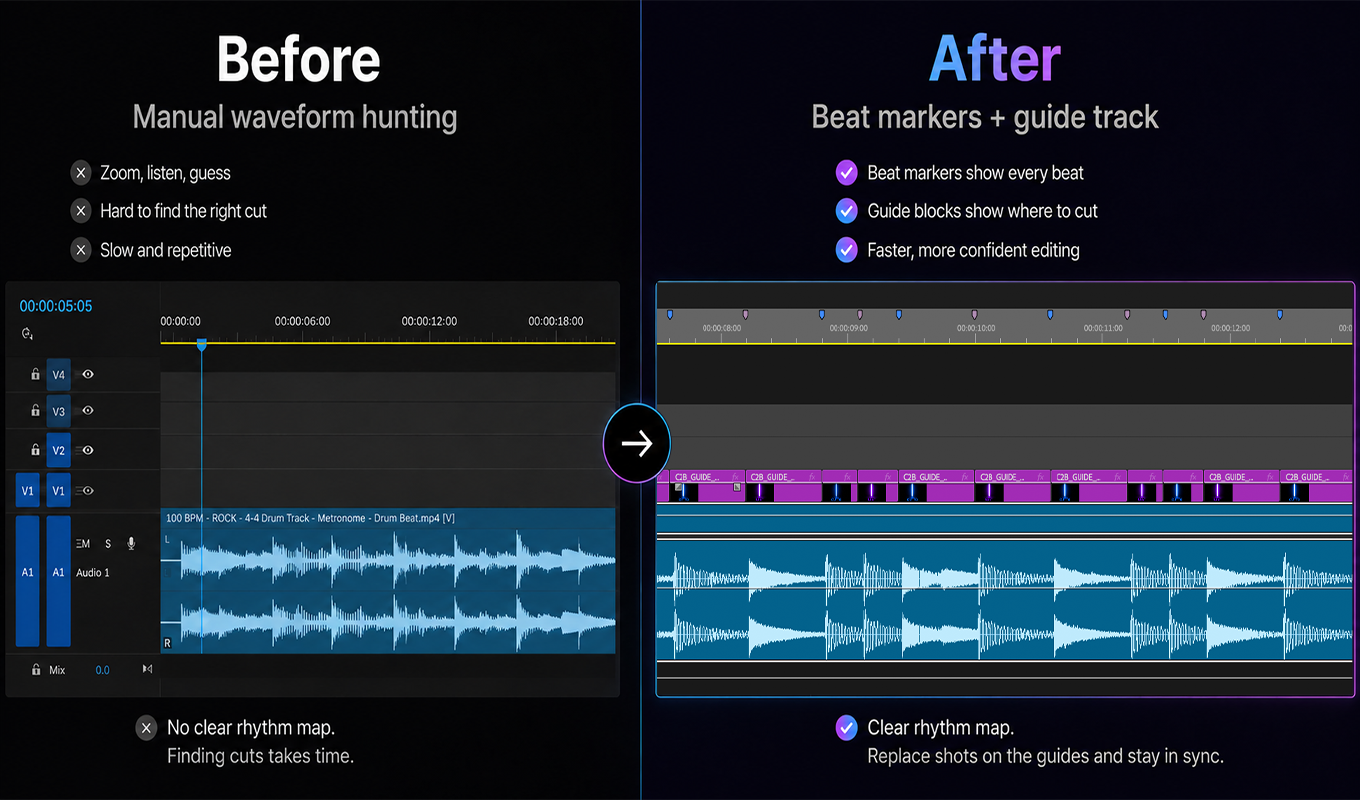
Why beat markers help
Music-driven edits become slow when every decision starts with searching the waveform. Beat markers give the timeline a visible structure, so you can place cuts, graphics, transitions, and speed changes with less guessing.
This matters most in reels, promos, social edits, performance videos, sports highlights, and any edit where rhythm is part of the pacing.
Manual method inside Premiere Pro
The basic manual workflow is simple: play the track, stop on a beat, and add a marker. It works, but it becomes repetitive when the track has many beats or when you need a dense rhythm map before editing.
Manual markers are still useful for creative decisions. Automatic markers are better for building the first rhythm structure quickly.
Faster method with Cut to Beat
Cut to Beat is built for the repetitive part of the workflow. It analyzes the audio, creates Premiere Pro timeline markers, and can generate a visual guide track that shows where beat-based cuts can land.
The goal is not to edit the video for you. The goal is to prepare the rhythm map so the editor can make faster, cleaner decisions.
Workflow
Step-by-step workflow
- 01
Prepare the music track
Place the music in your sequence and use a clean audio file where possible. WAV files are usually easier to analyze accurately than heavily compressed or noisy audio.
- 02
Choose the marker workflow
For short sections, you can press M manually on the beats. For full songs, promos, or repeated social edits, use Cut to Beat to create the first marker pass automatically.
- 03
Adjust detection sensitivity
Use lower sensitivity for cleaner tracks with strong beats. Use higher sensitivity when you want more rhythm points or when the beat is less obvious.
- 04
Create markers and guide blocks
Generate timeline markers first, then add a guide track if you want visible blocks on the timeline. Replace the guide blocks with real shots, graphics, or transitions as the edit develops.
- 05
Clean only generated markers when needed
If the first pass is too dense, remove the generated Cut to Beat markers and run detection again. Keep your manual editorial markers separate.
Practical notes
- Use beat markers as structure, not as a rule. Not every cut should land on a beat.
- For music edits, make the first rhythm pass before you start placing too many shots.
- Keep manual story markers separate from automatically generated beat markers.
Common mistakes
- Adding too many markers and making the timeline harder to read.
- Cutting every shot on a beat even when the footage needs a different rhythm.
- Using low-quality compressed audio and expecting perfect beat detection.
FAQ
Questions editors usually ask
Can Premiere Pro add beat markers automatically by default?
Premiere Pro has marker tools, but a dedicated beat-detection plugin is the faster route when you want many rhythm markers from a music track.
Should I use markers or a guide track?
Use markers when you want clean timing references. Use a guide track when you want visible blocks on the timeline that can be replaced with footage.
Is Cut to Beat for beginners or professional editors?
Both. Beginners get a clearer timeline, and professional editors save time on repetitive rhythm preparation.
Make this workflow faster in Premiere Pro
Detect beats, create Premiere Pro markers, and build visual guide tracks for faster rhythm-based editing.